
主题
Mermaid 用户指南
🌐 Mermaid User Guide
Mermaid 由三部分组成
🌐 Mermaid is composed of three parts
- 部署
- 语法
- 配置
本节讨论了部署 Mermaid 的不同方式。
🌐 This section talks about the different ways to deploy Mermaid.
如果你是初学者:
🌐 If you are a beginner:
- 查看 Diagram Syntax 页面
- 查看 教程 页面
使用 Mermaid 的方法
🌐 Ways to use Mermaid
要了解更多信息,请访问使用方法页面。
🌐 To learn more, visit the Usage page.
1. 使用 Mermaid 实时编辑器
🌐 1. Using the Mermaid Live Editor
可在 Mermaid 实时编辑器 网站上获取。
🌐 Available at the Mermaid Live Editor website.
特性
🌐 Features
• 图表代码
🌐 • Diagram Code
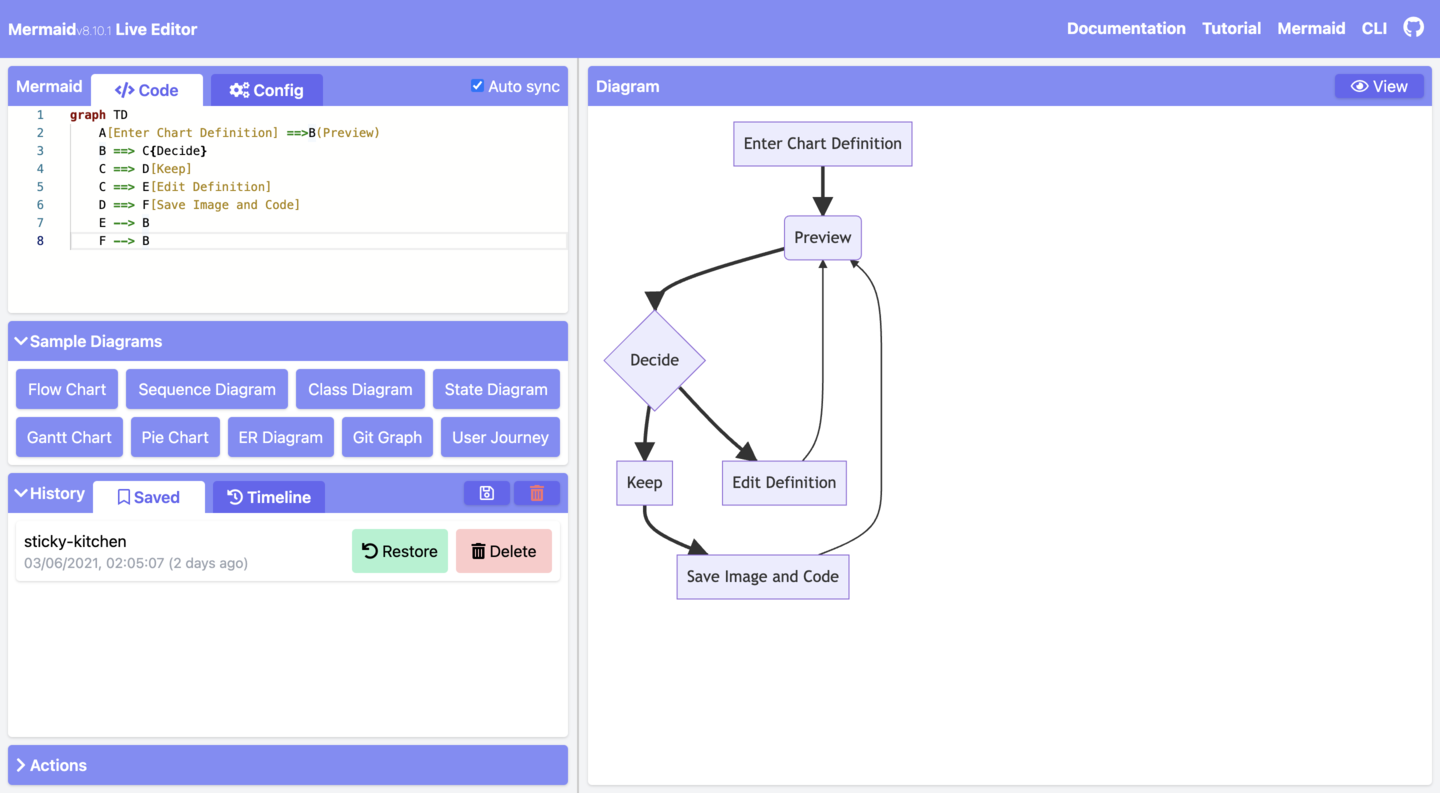
在 Code 面板中,编写或编辑 Mermaid 代码,并在图表面板中即时 Preview 渲染结果。
🌐 In the Code panel, write or edit Mermaid code, and instantly Preview the rendered result in the diagram panel.
这是一个 Mermaid 代码及其渲染结果的示例:
🌐 Here is an example of Mermaid code and its rendered result:
代码:
mermaid
• 配置
🌐 • Configurations
配置选项可在 Configuration 面板中使用。这些选项会应用到 Preview 面板中的图表。
🌐 Configuration options are available in the Configuration panel. The options are applied to the diagram in the Preview panel.
要了解更多信息,请访问配置参考页面
🌐 To learn more, visit the Configuration Reference page
• 编辑历史
🌐 • Editing History
你的代码将被自动保存,并显示在 History 部分的 Timeline 标签中。编辑会每分钟保存一次,但只能查看最近的 30 次编辑。
🌐 Your code will be autosaved and appear in the Timeline tab of the History section. Edits are saved every minute and only the last 30 edits are viewable.
或者,你可以通过点击 History 部分的 Save 图标手动保存代码。
🌐 Alternatively, you can manually save code by clicking on the Save icon from the History section.
信息
历史仅存储在浏览器存储中。
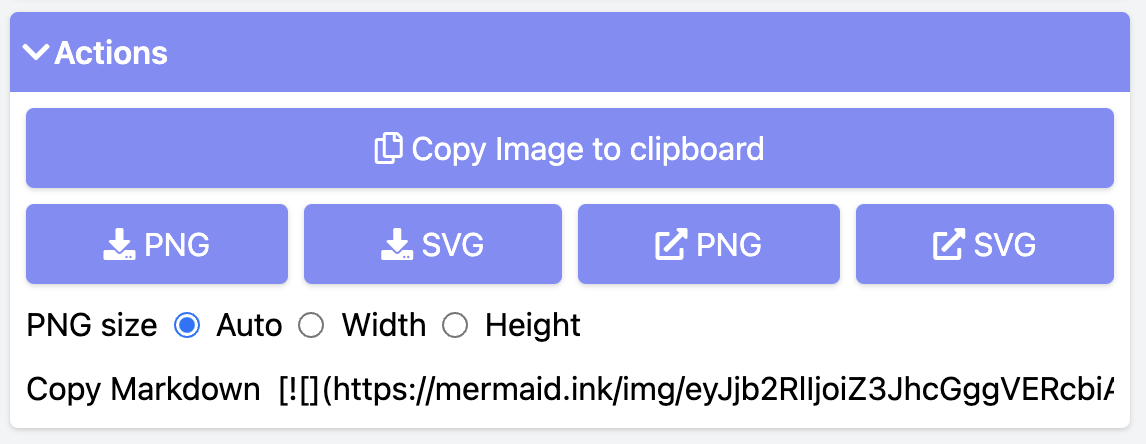
• 保存图表
🌐 • Saving a diagram
有多种方法可以从 Actions 部分保存你的图表:
🌐 There are multiple ways of saving your diagram from the Actions section:
- 导出 PNG
- 导出 SVG
- 导出为 Markdown
• 编辑你的图表
🌐 • Editing your diagrams
要编辑你的图表,你可以将现有的 Mermaid 图表代码复制粘贴到 Live Editor 的 Code 部分。
🌐 To edit your diagram, you can copy paste existing Mermaid diagram code into the Code section of the Live Editor.
或者:
🌐 Or:
- 从头创建一个新图表
- 使用
Sample Diagrams部分的示例图
• 从 Gists 加载
🌐 • Loading from Gists
你创建的 Gist 应该包含一个 code.mmd 文件,并且可以选择包含一个 config.json,类似这个示例。
🌐 The Gist you create should have a code.mmd file and optionally a config.json, similar to this example.
信息
要了解 Gist,请访问 GitHub 文档页面的 创建 Gist 章节。
创建 Gist 后,将 Gist 的 URL 复制并粘贴到 Actions 部分的相应字段中,然后点击 Load Gist 按钮。
🌐 Once you have created a Gist, copy paste the Gist URL into the respective field in the Actions section and click on the Load Gist button.
这是一个将 Gist 加载到编辑器中的示例:
🌐 Here is an example of a Gist being loaded into the Editor:
这是上面例子的图示视图:
🌐 And, here is the diagram view from the above example:
2. 使用 Mermaid 图表编辑器
🌐 2. Using the Mermaid Chart Editor
可在 Mermaid Chart 网站上获得。
🌐 Available at the Mermaid Chart website.
Mermaid Chart 是一个基于网页的图表编辑器,允许你在浏览器中创建和编辑图表。它由 Mermaid 背后的团队开发。
🌐 Mermaid Chart is a web-based diagram editor that allows you to create and edit diagrams in your browser. It is built by the team behind Mermaid.
功能包括:
🌐 Features include:
- AI 制图
- 协作与多用户编辑
- 存储
- 以及更多
要了解更多信息,请访问文档生态系统部分的 Mermaid 图表页面。
🌐 To learn more, visit the Mermaid Chart page in the Ecosystem section of the documentation.
或者访问 Mermaid Chart 网站 注册一个免费账户。
🌐 Or go to the Mermaid Chart website to sign up for a Free account.
3. 使用 Mermaid 插件
🌐 3. Using Mermaid Plugins
Mermaid 插件
🌐 Mermaid Plugins
你可以使用插件在流行的应用中生成 Mermaid 图表。
🌐 You can generate Mermaid diagrams from within popular applications using plug-ins.
有关 Mermaid 插件和集成的列表,请访问 集成页面。
🌐 For a list of Mermaid Plugins and Integrations, visit the Integrations page.
Mermaid 图表插件
🌐 Mermaid Chart Plugins
Mermaid 图表插件适用于:
🌐 Mermaid Chart plugins are available for:
要了解更多信息,请访问 Mermaid 图表插件 页面。
🌐 To learn more, visit the Mermaid Chart Plugins page.
原生 Mermaid 支持
🌐 Native Mermaid Support
对于支持 Markdown 的应用(例如 GitHub 和 GitLab),你可以通过创建一个 mermaid 代码块来添加 Mermaid 图表。
🌐 For apps that support markdown (e.g. GitHub and GitLab), you can add Mermaid diagrams by making a mermaid code block.
markdown
The following code-block will be rendered as a Mermaid diagram:

```mermaid
flowchart LR
  A --> B
```
4. 调用 Mermaid JavaScript API
🌐 4. Calling the Mermaid JavaScript API
此方法可用于任何常见的网页服务器,如 Apache、IIS、Nginx 和 Node Express。
🌐 This method can be used with any common web server like Apache, IIS, Nginx, and Node Express.
你还需要一个文本编辑工具,比如 Notepad++ 来生成 html 文件。然后通过网页浏览器部署,例如 Firefox、Chrome、Safari。
🌐 You will also need a text editing tool like Notepad++ to generate an html file. It is then deployed by a web browser, i.e. Firefox, Chrome, Safari.
信息
不支持 Internet Explorer。
该 API 通过从源 mermaid.js 提取渲染指令来在页面上渲染图表。
🌐 The API works by pulling rendering instructions from the source mermaid.js in order to render diagrams on the page.
Mermaid API 的要求
🌐 Requirements for the Mermaid API
在编写 html 文件时,我们在 html code 中向 web browser 提供两个指令:
🌐 When writing the html file, we give two instructions inside the html code to the web browser:
a. 我们想要创建的图表的 Mermaid 代码。
🌐 a. The Mermaid code for the diagram we want to create.
b. 通过 mermaid.esm.mjs 或 mermaid.esm.min.mjs 导入 Mermaid 库,以及调用 mermaid.initialize(),该调用决定了图表的外观并启动渲染过程。
🌐 b. The importing of the Mermaid library through the mermaid.esm.mjs or mermaid.esm.min.mjs, and the mermaid.initialize() call, which dictates the appearance of diagrams and also starts the rendering process.
示例
🌐 Examples
- 这是一个在
<pre class="mermaid">内嵌 Mermaid 图表定义的示例:
html
<body>
  Here is a mermaid diagram:
  <pre class="mermaid">
        graph TD
        A[Client] --> B[Load Balancer]
        B --> C[Server01]
        B --> D[Server02]
  </pre>
</body>
信息
每个 Mermaid 图表/图形/图解的定义都应该有单独的 <pre> 标签。
- 这是一个 Mermaid 导入示例以及
mermaid.initialize()调用。
信息
一个 mermaid.initialize() 调用会获取 <pre class="mermaid"> 标签中的所有定义并将它们渲染为图表。
html
<body>
  <script type="module">
    import mermaid from 'https://cdn.jsdelivr.net/npm/mermaid@11/dist/mermaid.esm.min.mjs';
    mermaid.initialize({ startOnLoad: true });
  </script>
</body>
信息
在 Mermaid 中的渲染是通过 mermaid.initialize() 调用初始化的。但是,做相反的操作可以让你控制它何时开始在网页中查找 <pre> 标签,方法是使用 mermaid.initialize()。当你认为在执行 mermaid.esm.min.mjs 文件时,并非所有 <pre> 标签都已加载时,这非常有用。
startOnLoad 是可以通过 mermaid.initialize() 定义的参数之一
| 参数 | 描述 | 类型 | 值 |
|---|---|---|---|
| startOnLoad | 加载时渲染的开关 | 布尔值 | true, false |
在这个例子中,mermaidAPI 是通过 CDN 调用的:
🌐 In this example, the mermaidAPI is being called through the CDN:
html
<html>
  <body>
    Here is one mermaid diagram:
    <pre class="mermaid">
            graph TD
            A[Client] --> B[Load Balancer]
            B --> C[Server1]
            B --> D[Server2]
    </pre>

    And here is another:
    <pre class="mermaid">
            graph TD
            A[Client] -->|tcp_123| B
            B(Load Balancer)
            B -->|tcp_456| C[Server1]
            B -->|tcp_456| D[Server2]
    </pre>

    <script type="module">
      import mermaid from 'https://cdn.jsdelivr.net/npm/mermaid@11/dist/mermaid.esm.min.mjs';
      mermaid.initialize({ startOnLoad: true });
    </script>
  </body>
</html>在这个例子中,mermaid.js 作为一个独立的 JavaScript 文件在 src 中被引用:
🌐 In this example, mermaid.js is referenced in src as a separate JavaScript file:
html
<html lang="en">
  <head>
    <meta charset="utf-8" />
  </head>
  <body>
    <pre class="mermaid">
            graph LR
            A --- B
            B-->C[fa:fa-ban forbidden]
            B-->D(fa:fa-spinner);
    </pre>
    <pre class="mermaid">
            graph TD
            A[Client] --> B[Load Balancer]
            B --> C[Server1]
            B --> D[Server2]
    </pre>
    <script type="module">
      import mermaid from 'The/Path/In/Your/Package/mermaid.esm.mjs';
      mermaid.initialize({ startOnLoad: true });
    </script>
  </body>
</html>
5. 添加 Mermaid 作为依赖
🌐 5. Adding Mermaid as a dependency
以下是将 Mermaid 添加为依赖的步骤:
🌐 Below are the steps for adding Mermaid as a dependency:
- 安装 Node.js v20 或更高版本(推荐使用长期支持版 LTS)。
信息
要了解有关下载和安装 Node.js 和 npm 的更多信息,请访问 npm 文档网站。
使用你喜欢的软件包管理器添加 Mermaid:
npm
npm install mermaidyarn
yarn add mermaidpnpm
pnpm add mermaid要改为将 Mermaid 添加为开发依赖,请附加 dev 标志:
npm:
npm install --save-dev mermaidYarn:
yarn add --dev mermaidpnpm:
pnpm add --save-dev mermaid
结语
🌐 Closing note
信息
Mermaid 创作者 Knut Sveidqvist 的注释:
- 在早期版本的 Mermaid 中,
<script>标签是放在网页的<head>部分的。如今,我们可以像上面看到的那样将其放在<body>中。文档的较旧部分经常反映以前的方式,这种方式仍然可用。